

When DNSSEC was first introduced, the only way to sign DNS data was using the dnssec-signzone utility; this would take an unsigned zone file and generate a new zone file containing signatures. This file would be loaded by named and served the same as any other zone file. Because DNSSEC signatures expire, the zone would have to be periodically resigned and reloaded.
Later, named acquired the ability to sign zones internally. The master server for a zone could now add and remove keys and generate and regenerate DNSSEC signatures automatically, remaining up-to-date without operator intervention. This required the zone to be configured as dynamic, however, which is incompatible with some existing DNS configurations, such as zones which are transferred from a provisioning database, are served from a master server not running BIND 9, or which need to be static.
With the release of BIND 9.9, ISC introduced a new "inline-signing" option for BIND 9, which allows named to sign zones completely transparently. A server can load or transfer an unsigned zone, and create a signed version of it which answers all queries and transfer requests, without altering the original unsigned version. As the unsigned zone is updated, named will detect the changes that are made to it, and apply those changes to the signed version. This allows a seamless transition to DNSSEC with minimal disruption to existing systems.
EXAMPLE 1: MASTER SERVER
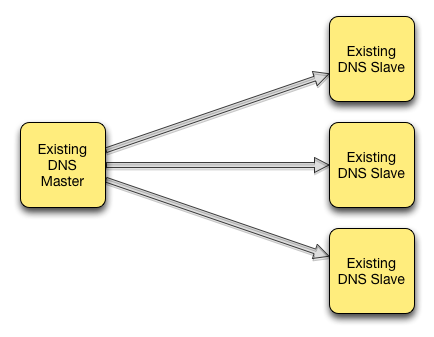
We begin with a master zone, served by a BIND 9 server on address 10.10.10.4. The zone data is stored on disk in a conventional zone file, and initially it is not signed. There are three slaves, 10.10.10.1, 10.10.10.2, and 10.10.10.3. All four authoritative servers can be queried.
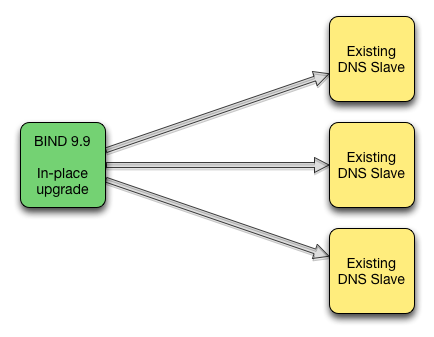
We can enable DNSSEC signing by upgrading the master server to BIND 9.9 and turning on inline-signing:
In the file example.com.db:
   $ORIGIN example.com.
    $TTL 300
    @ IN SOA ns1.example.com. hostmaster.example.com. (
                                    2012022301 1800 1800 1814400 3600
                              )
          NS ns1.example.com.
          NS ns2.example.com.
          NS ns3.example.com.
          NS ns4.example.com.

    ns1.example.com. IN A 10.10.10.1
    ns2.example.com. IN A 10.10.10.2
    ns3.example.com. IN A 10.10.10.3
    ns4.example.com. IN A 10.10.10.4

    ; ... more zone data
The named.conf configuration for the master zone is as follows:
        zone example.com {
            type master;
            file "/etc/bind/master/example.com.db";
            allow-transfer { localhost; 10.10.10.1; 10.10.10.2; 10.10.10.3; }
        };
To enable DNSSEC, first we need to generate two DNSSEC keys, one with and one without the KSK flag:
    $ mkdir /etc/bind/keys
    $ cd /etc/bind/keys
    $ dnssec-keygen example.com
    Generating key pair.....................++++++
    ...............++++++
    Kexample.com.+005+08160
    $ dnssec-keygen -fk example.com
    Generating key pair.....................................+++
    .............................................................+++
    Kexample.com.+005+19273
We add a few lines to the zone options in named.conf:
        zone example.com {
            type master;
            file "/etc/bind/master/example.com.db";
            allow-transfer { localhost; 10.10.10.1; 10.10.10.2; 10.10.10.3; };

            # look for dnssec keys here:
            key-directory "/etc/bind/keys";

            # publish and activate dnssec keys:
            auto-dnssec maintain;

            # use inline signing:
            inline-signing yes;
        };
And reset the server configuration:
    $ ls
    example.com.db
    $ rndc reconfig
    $ cd /etc/bind/master
    $ ls
    example.com.db  example.com.db.signed  example.com.db.signed.jnl
The new files "example.com.db.signed" and "example.com.db.signed.jnl" contain the DNSSEC-signed version of the zone; "example.com.db" retains the unsigned version.
The new rndc signing -list command can be used to confirm that the new zone has been fully signed:
        $ sbin/rndc signing -list example.nil
        Done signing with key 8160/RSASHA1
        Done signing with key 19273/RSASHA1
And we can confirm that named is serving the signed data by querying directly:
        $ dig +dnssec +noall +answer @localhost -t SOA example.com
        example.com.            300     IN      SOA     ns1.example.com.
        hostmaster.example.com. 2012022304 2000 2000 1814400 3600
        example.com.            300     IN      RRSIG   SOA 7 2 60
        20120325012742 20120224002742 8160 example.nil.
        he6IjhV2x330PhpsvynsCsFahDyxfXawtfrO70A4rn4x+q09tRPd2FWQ
        z0SZlxOBbqfPxx5bNV8kY4rFh/5s0AXN1DSHiWD6+PMpSsrFkb4b7D16
        brAIhNGZzqwTNwjqACB8Zfiv70wb9qWGsQV1z6U0s6/Eez7DTaEtRPN4 OWE=
Note that the serial number in this response is not the same as the one in the file example.com.db. named keeps track of the serial number of the signed version of the zone independently of the unsigned version. If the unsigned zone is updated with a new serial number that's higher than the one in the signed copy, then the signed copy will be increased to match it, but otherwise the two are kept separate.
There is no need to configure example.com as a dynamic zone; there are no 'update-policy' or 'allow-update' statements in the above zone options. The "example.com.db" file is never modified by this process. Before, named could only use one file for a given zone; if it was configured for automatic DNSSEC maintenance, the file would be overwritten with a fresh copy of the zone whenever the signatures were updated. Any comments in the file would be obliterated. This is no longer the case; signed DNS data is stored in example.com.db.signed and in the associated journal file, not in the original zone file.
These files are not human readable; for faster loading, the signed data is stored in raw (binary) format. To examine it, you can use the named-checkzone command to dump the zone contents as text:
$ named-checkzone -D -f raw -o - example.com example.com.db.signed
... or simply look at the zone with dig:
$ dig @localhost axfr example.com
EXAMPLE 2: SLAVE SERVER, USING HIDDEN MASTER
Again, we have a master server and three slaves. Unlike the previous example, this is a "hidden master" configuration, in which only the slave servers are accessible to the global Internet; 10.10.10.4 allows the slaves to transfer the zone from it, but it does not answer queries.
We wish to enable DNSSEC without modifying the master server's configuration at all. It may, for example, be a provisioning system not running BIND 9, but only providing DNS data via zone transfer to the slaves, and enabling DNSSEC on it is not practical. Using inline-signing, we can place a "bump in the wire" signing server between the master and the slaves.
The slaves' configuration initially looks like this:
        zone example.com {
            type slave;
            masters { 10.10.10.4; };
            file "/etc/bind/slave/example.com.bk";
        };
To enable DNSSEC, we bring up a new BIND 9.9 server on the address 10.10.10.5. The existing master server must be configured to allow transfers to this address.
As in example 1, we create DNSSEC keys:
    $ mkdir /etc/bind/keys
    $ cd /etc/bind/keys
    $ dnssec-keygen example.com
    Generating key pair........................+++++
    ...............++++++
    Kexample.com.+005+17262
    $ dnssec-keygen -fk example.com
    Generating key pair.....................................+++++
    ........................................................+++
    Kexample.com.+005+44139
We configure named to slave to the existing master server, but with inline-signing turned on:
        zone example.com {
            type slave;
            masters { 10.10.10.4; };
            file "/etc/bind/slave/example.com.bk";

            # look for dnssec keys here:
            key-directory "/etc/bind/keys";

            # publish and activate dnssec keys:
            auto-dnssec maintain;

            # use inline signing:
            inline-signing yes;
        };
When the new server is started, it will transfer a copy of the example.com domain from 10.10.10.4. It will keep a copy of this unsigned version of the zone, and create a signed version internally. You can verify the correctness of the DNSSEC data by querying the local server, as we saw in example 1.
At this point you can take as long as you wish to confirm that 10.10.10.5 is now serving a signed version of the zone, that it properly detects changes to the zone, that signatures are being properly maintained, etc. Once you are completely satisfied, you make the signed data public by reconfiguring the existing slave servers so that they treat the new server as master for the example.com domain:
        zone example.com {
            type slave;
            masters { 10.10.10.5; };               # Formerly 10.10.10.4!
            file "/etc/bind/slave/example.com.bk";
        };
After each slave's configuration is reset with rndc reconfig, it will transfer a new copy of the zone, but from the signing server instead of from the hidden master. The DNSSEC-signed version of the zone is now being publicly served, with very little disruption to existing processes.