

Introduction
Installing Stork can seem somewhat confusing at first. The purpose of this quickstart guide is to layout the installation process in steps grouped by package manager or OS. Choose your OS/package manager from the table of contents on the right hand side to jump directly to the section that will cover the installation on your system.
Since the Stork Agent may need to be installed more than once on disparate systems (example: to monitor BIND and Kea installations which typically may not reside on the same servers), more than one section may need to be visited for the Stork Agent installation.
The Stork packages themselves will be sourced from our repositories on cloudsmith.io.
This guide was updated as of Stork version 2.0.0. Using earlier versions of Stork with this guide may not result in success.
RedHat (RPM compatible)
This section covers installing on systems that use the RPM package manager. These could be RedHat Enterprise Linux, CentOS, Fedora, Rocky Linux, or any other RedHat based system (or clone) that uses the rpm command.
Adding the Stork repository
First add the Stork cloudsmith.io repository to the system:
You may notice in the instruction below that a script is being retrieved from cloudsmith and then executed as root. This may not sit well with some. There are instructions for manually adding the repository available here.
curl -1sLf 'https://dl.cloudsmith.io/public/isc/stork/cfg/setup/bash.rpm.sh' | sudo bash
Output should be shown similar to the following:
Executing the  setup script for the 'isc/stork' repository ...

   OK: Checking for required executable 'curl' ...
   OK: Checking for required executable 'rpm' ...
   OK: Detecting your OS distribution and release using system methods ...
 ^^^^: ... Detected/provided for your OS/distribution, version and architecture:
 >>>>:
 >>>>: ... distro=rocky  version=9.4  codename=Blue  arch=x86_64
 >>>>:
   OK: Importing 'isc/stork' repository GPG keys into rpm ...
   OK: Checking for available package manager (DNF/Microdnf/YUM/Zypper) ...
 ^^^^: ... Detected package manager as 'dnf'
   OK: Checking for dnf dependency 'dnf-plugins-core' ...
   OK: Checking if upstream install config is OK ...
   OK: Fetching 'isc/stork' repository configuration ...
   OK: Installing 'isc/stork' repository via dnf ...
  RUN: Updating the dnf cache to fetch the new repository metadata ...Importing GPG key 0x8053D1FB:
 Userid     : "Cloudsmith Package (isc/stork) <support@cloudsmith.io>"
 Fingerprint: 7AB5 064B 08F0 69A1 A5CC 500C 77F6 4EC2 8053 D1FB
 From       : https://dl.cloudsmith.io/public/isc/stork/gpg.77F64EC28053D1FB.key
Importing GPG key 0x8053D1FB:
 Userid     : "Cloudsmith Package (isc/stork) <support@cloudsmith.io>"
 Fingerprint: 7AB5 064B 08F0 69A1 A5CC 500C 77F6 4EC2 8053 D1FB
 From       : https://dl.cloudsmith.io/public/isc/stork/gpg.77F64EC28053D1FB.key
Importing GPG key 0x8053D1FB:
 Userid     : "Cloudsmith Package (isc/stork) <support@cloudsmith.io>"
 Fingerprint: 7AB5 064B 08F0 69A1 A5CC 500C 77F6 4EC2 8053 D1FB
 From       : https://dl.cloudsmith.io/public/isc/stork/gpg.77F64EC28053D1FB.key
   OK: Updating the dnf cache to fetch the new repository metadata ...
   OK: The repository has been installed successfully - You're ready to rock!
If you wish to stay up to date with more recent development versions, you may want to configure stork-dev alongside stork. That can be done by repeating the same command except stork gets replaced with stork-dev in the URL.
Related section in the Stork ARM.
Installing the Stork Server
Next, install the Stork Server. This only needs to be done on the system from which you will actually serve the Stork web UI.
sudo dnf install isc-stork-server
The usual RPM output should be shown here successfully installing the isc-stork-server package.
Related section in the Stork ARM.
Configuring the database
The next step is to configure the database for use by the Stork web based UI. Stork requires PostgreSQL. Be sure you have that installed and running. If it is not installed, you can run the following commands to set it up for the first time:
sudo dnf install postgresql postgresql-contrib postgresql-server
sudo postgresql-setup --initdb
sudo systemctl start postgresql
sudo systemctl enable postgresql
The stork-tool which is included with the isc-stork-server package is used to create the database as shown.
sudo -u postgres stork-tool db-create --db-name stork --db-user stork-server
Output similar to the following should be printed to the terminal:
INFO[2024-11-14 05:16:08]       connection.go:90    Checking connection to database
INFO[2024-11-14 05:16:08]       connection.go:155   Connected to database /var/run/postgresql/.s.PGSQL.5432
INFO[2024-11-14 05:16:08]       connection.go:90    Checking connection to database
INFO[2024-11-14 05:16:08]       connection.go:155   Connected to database /var/run/postgresql/.s.PGSQL.5432
INFO[2024-11-14 05:16:08]             main.go:99    Created database and user for the server with the following credentials  database_name="stork" password="kUGGzJF8Mw8CvycfQ9NF0p6M6Y9oj15u" user="stork-server"
If an error is shown something like this:
FATA[2024-11-14 05:16:08] main.go:111 Cannot create the database extension error="problem creating database extension \"pgcrypto\": ERROR #58P01 could not open extension control file \"/usr/share/pgsql/extension/pgcrypto.control\": No such file or directory"
Then it may mean that you are missing the postgres contrib package which can be installed as shown:
sudo dnf install postgresql-contrib
Then retry the stork-tool command.
Related section in the Stork ARM.
Configuring the Stork Server
Next up is configuring the Stork Server configuration file. Assuming the PostgreSQL database service and the Stork web UI service are on the same server and the previous stork-tool command line was executed as noted in the earlier instructions, there is very little that must be changed in /etc/stork/server.env. Edit that file with your favorite command line text editor. The only change needed is to uncomment the line that contains STORK_DATABASE_USER_NAME and set the username to stork-server as shown: STORK_DATABASE_USER_NAME=stork-server.
Related section in the Stork ARM.
Starting the Stork Server
Next, the server must be enabled and started in systemd. Enable the Stork Server:
sudo systemctl enable isc-stork-server
Start the Stork Server:
sudo systemctl start isc-stork-server
Now check the status to make sure it is running correctly:
sudo systemctl status isc-stork-server
Now you should be able to connect to the web interface using the http://IP_address_of_your_server:8080 (example: http://192.168.20.27:8080). If it doesn't answer, you may need to investigate firewall rules. Some recent RedHat (and compatible), by default, run firewalld which may block this connection. Find out if that is the problem by running sudo systemctl stop firewalld. If you can now connect to the web service, then rules in firewalld will need to be added to allow connection. Configuration of this service is beyond the scope of this document.
The default username and password are admin/admin. After logging in, you will be prompted to change the password for the admin user.
Related section in the Stork ARM.
Installing the Stork Agent
The final step is to install the Stork Agent on any systems where you wish to monitor ISC servers. Currently, the Stork Agent is capable of monitoring both Kea and BIND. It should auto-detect these servers and may start monitoring them with little intervention on your part.
To install the Stork Agent, add the repository to any RedHat/RPM compatible system where you want to monitor these services in the same manner as performed earlier:
curl -1sLf 'https://dl.cloudsmith.io/public/isc/stork/cfg/setup/bash.rpm.sh' | sudo bash
Now install the Stork Agent in this way:
sudo dnf install isc-stork-agent
which should produce the usual RPM messages about the installation.
Now enable the Stork Agent using systemctl as shown.
sudo systemctl enable isc-stork-agent
Now start the agent.
sudo systemctl start isc-stork-agent
Make sure the Stork Agent is running using status.
sudo systemctl status isc-stork-agent
Related section in the Stork ARM.
Please note that if the Stork Server and Stork Agent are both on the same machine, that they both default to port 8080. The easiest thing to do is alter /etc/stork/agent.env uncommenting the STORK_AGENT_PORT directive and setting thusly: STORK_AGENT_PORT=8081. This way, the agent will listen on port 8081 and the server will listen on port 8080 as per default.
Since version 1.17.0, The Stork Agent won't start until it has been registered with the Stork Server. This change is described here. Simply follow the next step, which is to Register the Stork Agent, then attempt to start the Stork Agent again.
Register Stork Agent
Once the Stork Agent is confirmed to be running, the agent must be registered with the Stork Server. Execute the registeration command as shown on the server with the stork-agent installed.
sudo su stork-agent -s /bin/sh -c 'stork-agent register --server-url http://stork.example.org:8080'
where stork.example.org is replaced with the hostname or IP address of the server running the Stork Server. Accepting the defaults is fine.
If you had to alter the Stork Agent Port to 8081 due to cohabitation with the Stork Server, then you will have to specify the port number during the registration process as shown here: >>>> Enter port number that Stork Agent will listen on [8080]: 8081
Once the process completes, the agent must be authorized on the Stork Server. Visit Services -> Machines and then click on Unauthorized. The server with the Stork agent should be shown here. Click the hamburger menu and click Authorize. Click the Authorized tab to make sure that this succeeded. If this fails, showing a message like this:
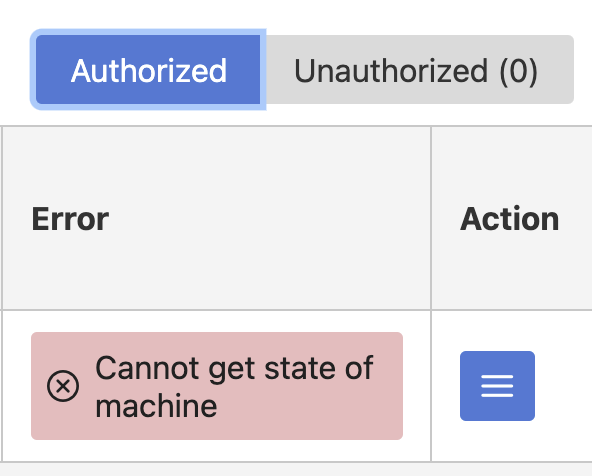
it may be due to firewalld. Try stopping firewalld sudo systemctl stop firewalld on the server with the Stork agent installed and then click the hamburger menu in the Stork web UI and click refresh. If this works, then firewalld rules will need adjustment going forward. Configuration of firewalld is beyond the scope of this document.
Check the web interface. New options should have appeared under the DHCP menu. If nothing new appears, try refreshing the browser window.
It is possible that there is a problem with the permissions on the /etc/kea/kea-ctrl-agent.conf file. The stork-agent process may not be able to read this file. Check the stork-agent log using this command: sudo journalctl -xe | grep stork-agent. If there is a permission problem, an error similar to this one should appear in the logs:
Sep 10 17:00:06 dynamic-192-168-20-19.home.arpa stork-agent[72125]: time="2024-09-10 17:00:06" level="error" msg="Invalid Kea Control Agent config" file=" kea.go:219 " error="Cannot read Kea config file: cannot read the configuration file: open /etc/kea/kea-ctrl-agent.conf: permission denied"
Check the group memberships of the stork-agent user with this command: sudo groups stork-agent. The group kea may not appear in the output as shown:
$ sudo groups stork-agent
stork-agent : stork-agent
Add the user to the group with this command: usermod -aG kea stork-agent. This should resolve the issue. Please note that you may need to restart the stork-agent process with this command: sudo systemctl restart isc-stork-agent. After a few minutes, the DHCP menu should appear in the Stork GUI. To accelerate this process, navigate to the Services -> Machines area in the GUI. Click the hamburger menu next to the machine in question. Click refresh.
Monitoring BIND 9
If only DHCP options appear in the Stork web UI, it is possible that BIND is not being monitored. If you do not have an rndc.conf file, this can be the case. Set this up using rndc-confgen which will print out rndc.conf configurations. Place these in an rndc.conf file in the same directory as named.conf. There is a commented out section similar to:
# Use with the following in named.conf, adjusting the allow list as needed:
# key "rndc-key" {
# 	algorithm hmac-sha256;
# 	secret "TTWW+Lf1KElICDFOc8nShvlMb1vvFPDnW1wz8afHjfI=";
# };
#
# controls {
# 	inet 127.0.0.1 port 953
# 		allow { 127.0.0.1; } keys { "rndc-key"; };
# };
# End of named.conf
Place this in the named.conf file and uncomment the key and controls sections. Restart named and Stork should be monitoring BIND.
The Stork agent may also need access to named.conf and rndc.conf which it may not be able to access by default. Find these files and confirm that "other" has read access to them. For example:
$ ls -alFh /etc/opt/isc/scls/isc-bind/rndc.conf
-rw-r--r--. 1 root root 525 Jun  7 15:16 /etc/opt/isc/scls/isc-bind/rndc.conf
notice the third 'r' shown in the permissions. Keep an eye out for other permission denied error messags in the stork-agent logs. It is really difficult to predict what permissions issues might be encountered without knowing the source of the BIND installation (official ISC packages, distro specific packages, or compiled from source).
Related section in the Stork ARM.
Debian (apt compatible)
This section covers installing on systems that use the apt (.deb) package manager. These could be Debian, Ubuntu, Knoppix, Linux Mint, or any other Debian based system that uses the apt command.
Adding the Stork repository
First add the Stork cloudsmith.io repository to the system:
You may notice in the instruction below that a script is being retrieved from cloudsmith and then executed as root. This may not sit well with some. There are instructions for manually adding the repository available here.
curl -1sLf 'https://dl.cloudsmith.io/public/isc/stork/cfg/setup/bash.deb.sh' | sudo bash
Output should be shown similar to the following:
Executing the  setup script for the 'isc/stork' repository ...

   OK: Checking for required executable 'curl' ...
   OK: Checking for required executable 'apt-get' ...
   OK: Detecting your OS distribution and release using system methods ...
 ^^^^: ... Detected/provided for your OS/distribution, version and architecture:
 >>>>:
 >>>>: ... distro=debian  version=12  codename=bookworm  arch=x86_64
 >>>>:
 NOPE: Checking for apt dependency 'apt-transport-https' ...
   OK: Updating apt repository metadata cache ...
   OK: Attempting to install 'apt-transport-https' ...
   OK: Checking for apt dependency 'ca-certificates' ...
 NOPE: Checking for apt dependency 'gnupg' ...
   OK: Attempting to install 'gnupg' ...
   OK: Checking for apt signed-by key support ...
   OK: Importing 'isc/stork' repository GPG keys ...
   OK: Checking if upstream install config is OK ...
   OK: Installing 'isc/stork' repository via apt ...
   OK: Updating apt repository metadata cache ...
   OK: The repository has been installed successfully - You're ready to rock!
If you wish to stay up to date with more recent development versions, you may want to configure stork-dev alongside stork. That can be done by repeating the same command except stork gets replaced with stork-dev in the URL.
Related section in the Stork ARM.
Installing the Stork Server
Next, install the Stork Server. This only needs to be done on the system from which you will actually serve the Stork web UI.
sudo apt install isc-stork-server
The usual apt install output should be shown here.
Related section in the Stork ARM.
Configuring the database
The next step is to configure the database for use by the Stork web based UI. Stork requires PostgreSQL. Be sure you have that installed and running. If it is not installed, you can run the following commands to set it up for the first time:
sudo apt install postgresql postgresql-contrib
sudo postgresql-setup --initdb
sudo systemctl start postgresql
sudo systemctl enable postgresql
sudo -u postgres stork-tool db-create --db-name stork --db-user stork-server
Output similar to the following should be printed to the terminal:
INFO[2024-11-14 05:31:39]       connection.go:90    Checking connection to database
INFO[2024-11-14 05:31:39]       connection.go:145   Connected to database /var/run/postgresql/.s.PGSQL.5432
INFO[2024-11-14 05:31:39]       connection.go:90    Checking connection to database
INFO[2024-11-14 05:31:39]       connection.go:145   Connected to database /var/run/postgresql/.s.PGSQL.5432
INFO[2024-11-14 05:31:39]             main.go:115   Created database and user for the server with the following credentials  database_name="stork" password="hwF8XOSoLZn+r63gLHNirl2yJJbb0Q8N" user="stork"
Related section in the Stork ARM.
Configuring the Stork Server
Next up is configuring the Stork Server configuration file. Assuming the PostgreSQL database service and the Stork web UI service are on the same server and the previous stork-tool command line was executed as noted in the earlier instructions, there is very little that must be changed in /etc/stork/server.env. Edit that file with your favorite command line text editor. The only change needed is to uncomment the line that contains STORK_DATABASE_USER_NAME and set the username to stork-server as shown: STORK_DATABASE_USER_NAME=stork-server.
Related section in the Stork ARM.
Starting the Stork Server
Next, the server must be enabled and started in systemd. Enable the Stork Server:
sudo systemctl enable isc-stork-server
Start the Stork Server:
sudo systemctl start isc-stork-server
Now check the status to make sure it is running correctly:
sudo systemctl status isc-stork-server
Now you should be able to connect to the web interface using the http://IP_address_of_your_server:8080 (example: http://192.168.20.27:8080). The default username and password are admin/admin. After logging in, you will be prompted to change the password for the admin user.
Related section in the Stork ARM.
Installing the Stork Agent
The final step is to install the Stork Agent on any systems where you wish to monitor ISC servers. Currently, the Stork Agent is capable of monitoring both Kea and BIND. It should auto-detect these servers and may start monitoring them with little intervention on your part.
To install the Stork Agent, add the repository to any apt/.deb compatible system where you want to monitor these services in the same manner as performed earlier:
curl -1sLf 'https://dl.cloudsmith.io/public/isc/stork/cfg/setup/bash.deb.sh' | sudo bash
Now install the Stork Agent:
sudo apt install isc-stork-agent
which should produce normal apt messages during the installation.
Now enable the Stork Agent using systemctl.
sudo systemctl enable isc-stork-agent
Then start the agent.
sudo systemctl start isc-stork-agent
Make sure the Stork Agent is running properly using status.
sudo systemctl status isc-stork-agent
Related section in the Stork ARM.
Please note that if the Stork Server and Stork Agent are both on the same machine, that they both default to port 8080. The easiest thing to do is alter /etc/stork/agent.env uncommenting the STORK_AGENT_PORT directive and setting thusly: STORK_AGENT_PORT=8081. This way, the agent will listen on port 8081 and the server will listen on port 8080 as per default.
Since version 1.17.0, The Stork Agent won't start until it has been registered with the Stork Server. This change is described here. Simply follow the next step, which is to Register the Stork Agent, then attempt to start the Stork Agent again.
Register Stork Agent
Once the Stork Agent is confirmed to be running, the agent must be registered with the Stork Server. Execute the registeration command as shown on the server with the stork-agent installed.
sudo su stork-agent -s /bin/sh -c 'stork-agent register --server-url http://stork.example.org:8080'
where stork.example.org is replaced with the name or IP of the server running the Stork Server. Accepting the defaults is fine.
If you had to alter the Stork Agent Port to 8081 due to cohabitation with the Stork Server, then you will have to specify the port number during the registration process as shown here: >>>> Port number that Stork Agent will listen on [8080]: 8081
Once the process completes, the agent must be authorized on the Stork Server. Visit Services -> Machines and then click on Unauthorized. The server with the Stork agent should be shown here. Click the hamburger menu and click Authorize.
Check the web interface. New options should have appeared under the DHCP menu. If nothing new appears, try refreshing the browser window.
Monitoring BIND 9
If only DHCP options appear in the Stork web UI, it is possible that BIND is not being monitored. If you do not have an rndc.conf file, this can be the case. Set this up using rndc-confgen which will print out rndc.conf configurations. Place these in an rndc.conf file in the same directory as named.conf. There is a commented out section similar to:
# Use with the following in named.conf, adjusting the allow list as needed:
# key "rndc-key" {
# 	algorithm hmac-sha256;
# 	secret "TTWW+Lf1KElICDFOc8nShvlMb1vvFPDnW1wz8afHjfI=";
# };
#
# controls {
# 	inet 127.0.0.1 port 953
# 		allow { 127.0.0.1; } keys { "rndc-key"; };
# };
# End of named.conf
Place this in the named.conf file and uncomment the key and controls sections. Restart named and Stork should be monitoring BIND.
The Stork agent may also need access to named.conf and rndc.conf which it may not be able to access by default. Find these files and confirm that "other" has read access to them. For example:
$ ls -alFh /etc/opt/isc/scls/isc-bind/rndc.conf
-rw-r--r--. 1 root root 525 Jun  7 15:16 /etc/opt/isc/scls/isc-bind/rndc.conf
notice the third 'r' shown in the permissions. Keep an eye out for other permission denied error messags in the stork-agent logs. It is really difficult to predict what permissions issues might be encountered without knowing the source of the BIND installation (official ISC packages, distro specific packages, or compiled from source).
Related section in the Stork ARM.